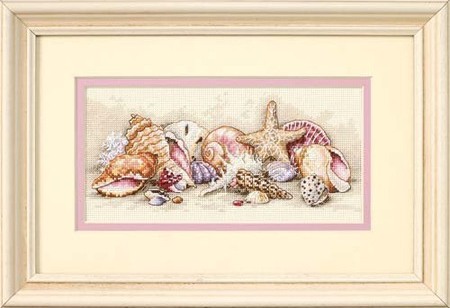
I framed my mother's seashells at the same time as Kellan's name. So I have that one to share with you today.
This really isn't that great of a picture.
The top mat is kind of an off white shiny looking mat. The next one is a dark burgundy, and the bottom is a lightish pink, probably the one closest to its true color.
I decided to take a picture of where it's hanging.
The top mat looks closer to color in this picture. But I just figured the mahogany frame would make more sense in context.
A blog of my crafting adventures, from cross stitch and needle point, to beading, jewelry, crocheting and beyond.
Showing posts with label Gift. Show all posts
Saturday, August 20, 2016
Tuesday, August 16, 2016
Train Kellan: Second Post - Framed
This is going to be short and sweet today... Or probably just short.
So here's the framed version of Kellan's Train themed name:
We just framed it exactly the same way as we had framed Logan's. Everything's the same, the size, the mat colors, the mat widths, and the frame. So nothing really exciting here. Now just to wait for November for him to open it on his birthday.
So here's the framed version of Kellan's Train themed name:
We just framed it exactly the same way as we had framed Logan's. Everything's the same, the size, the mat colors, the mat widths, and the frame. So nothing really exciting here. Now just to wait for November for him to open it on his birthday.
Monday, July 18, 2016
Welcome to the Jungle: Second Post - Framed
Alrighty. It has been a while... So I've been busy, I'm starting a new job tomorrow! Yay! So hopefully now I'll have more time for crafting and I'll be less tired. Who knows, the new job might kill all my desire to craft... I really hope not. My craft room will get lonely if I don't craft.
Moving on. I have tons of framed items to share. Today I'm going to share Welcome to the Jungle. This was for my youngest nephew. We framed it the same way we framed his brother's so that was really easy.
Here we go:
I was at my sister's house when I took this and my mother was there too, so they decided we should take a picture with Kellan next to his cross stitch. We told him to sit by his picture...
... Apparently we should have been more specific.
So we told him to sit next to the picture.
Much better.
And of course the eldest didn't want to be left out so we took his off the wall and took a picture with him next to his.
My mother actually stitched this one, but I did frame it, so up on my blog it goes!
The boys are 2 ½ and 5 ½ in the pictures which were taken about a month ago. They grow so fast!
I have a few things to blog about, I just don't want to stop working on things long enough to blog. Also I'm starting to work off of my iPad instead of my laptop, so before I'd already have the laptop on and would just blog, now I need to turn on the laptop, and it's much easier to just continue stitching. I'm going to work on another long overdue post. I'll see you again soon!
Moving on. I have tons of framed items to share. Today I'm going to share Welcome to the Jungle. This was for my youngest nephew. We framed it the same way we framed his brother's so that was really easy.
Here we go:
I was at my sister's house when I took this and my mother was there too, so they decided we should take a picture with Kellan next to his cross stitch. We told him to sit by his picture...
... Apparently we should have been more specific.
So we told him to sit next to the picture.
Much better.
And of course the eldest didn't want to be left out so we took his off the wall and took a picture with him next to his.
My mother actually stitched this one, but I did frame it, so up on my blog it goes!
The boys are 2 ½ and 5 ½ in the pictures which were taken about a month ago. They grow so fast!
I have a few things to blog about, I just don't want to stop working on things long enough to blog. Also I'm starting to work off of my iPad instead of my laptop, so before I'd already have the laptop on and would just blog, now I need to turn on the laptop, and it's much easier to just continue stitching. I'm going to work on another long overdue post. I'll see you again soon!
Saturday, May 28, 2016
Train Kellan: First Post
Some of you may remember the name I cross stitched for my first nephew, Logan. For those of you who have no idea what I'm talking about you can find the posts here.
My younger nephew likes trains, that is what my sister thinks she wants to change his room to. However, she's having difficulties finding anything other than Thomas the Train, and she doesn't want to go that route. So I started scouring the internet for train letters. I found quite a few, but none were what I wanted. Most were an engine on the front, letters on flatbeds and a caboose. However, I wanted to keep the two as similar to each other as I could. So I decided to do the only thing I could, design my own.
And that's what I did. I used the same letters from the original Firefighter's Sampler and created a train theme.
The first letter up is L, or Ls. I decided these would work well for some train crossing signals, one for each L. I found an photograph and copied it as best I could. However, the only way I could get it to work the way I wanted was for the poles to be off a half a stitch, and since I was going to be stitching this on evenweave it seemed completely doable.
First the letter, in the same blue color as Logan's, I had originally thought of changing it to green. But my sister suggested to keep it the same color. I think I like the pattern better with the blue anyway.
Now for the crosses of the crossing signals.
And some back-stitching so you can actually see where the white is.
And there they are.
Next up is the E. My sister suggested a tunnel for the A, but I already had another idea for the A, and I thought that too much would be covered up of the tunnel if I used that letter, so the tunnel went to the E. This one I just made up. I didn't use a picture or anything, I just kind of did a stereotypical tunnel.
E first, the entire E is actually visible, the tunnel goes behind it.
So when I counted and double counted to make sure I counted right, I eventually found that I hadn't counted right. Everything was two stitches too far to the right. I knew I had to fix it or the tunnel would run into the signals, and I didn't want that, so I did a little creative cross stitching and corrected my mistake without having to tear out every single stitch.
Now for the tunnel. I tried to make a kind of brick looking archway around it. And it's dark in there, so there's black, and then the light gray on the bottom for the rock ballast that hold the wooden ties.
Originally there was going to be a cross stitched line of brown for the closest tie, but I was showing my design progress to my sister and she thought it looked weird and asked me try it without it, and after I altered it, I agreed the new design looked better.
Which leads me to the next image with all the back-stitching.
The "closest" two ties are actually long-stitched with two strands, while the rest are single strands, and I did long stitches as well for the rails so they looked like one continuous piece of metal. I didn't back-stitch around the brown, I was hoping that would give the feeling like the brown didn't end there, but rather continued to the rest of the hill.
Next one is K. This is the first one designed, and, I have to admit, this is the letter that I designed the least. Since the K is the first letter it seemed fitting that it would have the engine. I had found a simple pattern that I really liked, and, surprisingly enough, it ended up being the perfect size. So, I copied it, my apologies to whoever actually created it, but since I'm not selling this I think I'm okay. But here's the blog post with the original image I used to create mine.
After my misadventure with the E I decided to make doubly sure that I counted correctly on the K. And I failed, this time it was one stitch too far right. Maybe I'll have more luck with the other two letters.
Here's the train in front of the K.
And a massive amount of back-stitching was done on this.
You may have noticed a few missing back-stitches on the K, well, that's where I'm going to use a gray Kreinik for the steam or smoke coming out of the stack. I just forgot the Kreinik at home.
Project Stats:
Pattern: Train Kellan
Pattern by: Me, using letters from Firefighter's Sampler
Started Stitching: May 23, 2016
Fabric: 28ct. White Evenweave
Floss: DMC 2 over 2
Percentage: 57.63% complete
Stitches: 2,174 out of 3,772 complete
So, this was one of the two pieces I was supposed to work on next from my list. Even though his birthday isn't until November, I wanted to get it done before a custom framing coupon expires. However, I ordered a kit from HAED. And it's VERY tempting to start on it. I must resist!
My younger nephew likes trains, that is what my sister thinks she wants to change his room to. However, she's having difficulties finding anything other than Thomas the Train, and she doesn't want to go that route. So I started scouring the internet for train letters. I found quite a few, but none were what I wanted. Most were an engine on the front, letters on flatbeds and a caboose. However, I wanted to keep the two as similar to each other as I could. So I decided to do the only thing I could, design my own.
And that's what I did. I used the same letters from the original Firefighter's Sampler and created a train theme.
The first letter up is L, or Ls. I decided these would work well for some train crossing signals, one for each L. I found an photograph and copied it as best I could. However, the only way I could get it to work the way I wanted was for the poles to be off a half a stitch, and since I was going to be stitching this on evenweave it seemed completely doable.
First the letter, in the same blue color as Logan's, I had originally thought of changing it to green. But my sister suggested to keep it the same color. I think I like the pattern better with the blue anyway.
Now for the crosses of the crossing signals.
And some back-stitching so you can actually see where the white is.
And there they are.
Next up is the E. My sister suggested a tunnel for the A, but I already had another idea for the A, and I thought that too much would be covered up of the tunnel if I used that letter, so the tunnel went to the E. This one I just made up. I didn't use a picture or anything, I just kind of did a stereotypical tunnel.
E first, the entire E is actually visible, the tunnel goes behind it.
So when I counted and double counted to make sure I counted right, I eventually found that I hadn't counted right. Everything was two stitches too far to the right. I knew I had to fix it or the tunnel would run into the signals, and I didn't want that, so I did a little creative cross stitching and corrected my mistake without having to tear out every single stitch.
Now for the tunnel. I tried to make a kind of brick looking archway around it. And it's dark in there, so there's black, and then the light gray on the bottom for the rock ballast that hold the wooden ties.
Originally there was going to be a cross stitched line of brown for the closest tie, but I was showing my design progress to my sister and she thought it looked weird and asked me try it without it, and after I altered it, I agreed the new design looked better.
Which leads me to the next image with all the back-stitching.
The "closest" two ties are actually long-stitched with two strands, while the rest are single strands, and I did long stitches as well for the rails so they looked like one continuous piece of metal. I didn't back-stitch around the brown, I was hoping that would give the feeling like the brown didn't end there, but rather continued to the rest of the hill.
Next one is K. This is the first one designed, and, I have to admit, this is the letter that I designed the least. Since the K is the first letter it seemed fitting that it would have the engine. I had found a simple pattern that I really liked, and, surprisingly enough, it ended up being the perfect size. So, I copied it, my apologies to whoever actually created it, but since I'm not selling this I think I'm okay. But here's the blog post with the original image I used to create mine.
After my misadventure with the E I decided to make doubly sure that I counted correctly on the K. And I failed, this time it was one stitch too far right. Maybe I'll have more luck with the other two letters.
Here's the train in front of the K.
And a massive amount of back-stitching was done on this.
You may have noticed a few missing back-stitches on the K, well, that's where I'm going to use a gray Kreinik for the steam or smoke coming out of the stack. I just forgot the Kreinik at home.
Project Stats:
Pattern: Train Kellan
Pattern by: Me, using letters from Firefighter's Sampler
Started Stitching: May 23, 2016
Fabric: 28ct. White Evenweave
Floss: DMC 2 over 2
Percentage: 57.63% complete
Stitches: 2,174 out of 3,772 complete
So, this was one of the two pieces I was supposed to work on next from my list. Even though his birthday isn't until November, I wanted to get it done before a custom framing coupon expires. However, I ordered a kit from HAED. And it's VERY tempting to start on it. I must resist!
Thursday, May 19, 2016
Seashell Treasures: First Post - Completed
I finished this faster than I originally thought. I just kept pushing myself telling myself if I just get it done I won't have to do it anymore. Yeah, that's a stupid statement but it got me through it.
I made this for my mother for her birthday... in January, oops. I actually had everything except the back-stitching done before her birthday. So it has taken four months to do the back stitching, which I did almost all of it Tuesday.
I started this originally to have it completed as a Christmas present, but work was too busy, I just didn't have enough hours in the day to complete everything I wanted to do.
Anyway, my parents' master bathroom is shell themed, not beach themed. When I saw this pattern in the store it seemed perfect.
Interesting side note: I seem to make quite a few things for my parents' bathrooms. For those confused I made Anthera and Colombina for a bathroom too, even though they currently are not in the intended bathroom.
Wow, I'm chatty today... moving on: Here I have a couple of colors, mostly neutrals.
Then I got tired of neutrals and did the pinks.
And everything else (except back-stitching):
And finally the back-stitching that I was procrastinating on.
I altered the back stitching on the starfish. It was supposed to have three stranded back-stitching on it, that just seemed too busy and bulky. I already liked the starfish without all the white back-stitching, so I figured taking it down to one strand might not be a bad idea. Actually... I guess they're called sea stars now according to my 5-year-old nephew... That's not happening, they'll more than likely always be star fish to me.
Funny thing is another blog I follow, Cross Stitch Angel, also stitched this. She finished this early last month. She decided to completely omit the back-stitching on the starfish.
Project Stats:
Pattern: Seashell Treasures
Pattern by: Dimensions
Started Stitching: December 10, 2015
Finished Stitching: May 19, 2016
Fabric: 18ct. Ivory Aida
Floss: Kit Floss various over 1
Percentage: 100% complete
Stitches: 5,826 out of 5,826 complete
I know what my list says I'm supposed to work on next, I'm not sure if I'll actually do what I've planned or make a slight deviation.
I started this originally to have it completed as a Christmas present, but work was too busy, I just didn't have enough hours in the day to complete everything I wanted to do.
Anyway, my parents' master bathroom is shell themed, not beach themed. When I saw this pattern in the store it seemed perfect.
Interesting side note: I seem to make quite a few things for my parents' bathrooms. For those confused I made Anthera and Colombina for a bathroom too, even though they currently are not in the intended bathroom.
Wow, I'm chatty today... moving on: Here I have a couple of colors, mostly neutrals.
Then I got tired of neutrals and did the pinks.
And everything else (except back-stitching):
And finally the back-stitching that I was procrastinating on.
Funny thing is another blog I follow, Cross Stitch Angel, also stitched this. She finished this early last month. She decided to completely omit the back-stitching on the starfish.
Project Stats:
Pattern: Seashell Treasures
Pattern by: Dimensions
Started Stitching: December 10, 2015
Finished Stitching: May 19, 2016
Fabric: 18ct. Ivory Aida
Floss: Kit Floss various over 1
Percentage: 100% complete
Stitches: 5,826 out of 5,826 complete
I know what my list says I'm supposed to work on next, I'm not sure if I'll actually do what I've planned or make a slight deviation.
Monday, May 9, 2016
Welcome to the Jungle: First Post - Completed
I was going to work on Ophelia, but while working on my sister's blanket I realized I really should finish another project for my youngest nephew.This is a discontinued pattern, I was barely able to find a picture of it at all, and the original paperwork was lost. This originally was being stitched by my mother. She got frustrated with it, she kept counting wrong and just couldn't get through it. So I offered to take over and finish it off. However, it was completely lost, what she had already stitched and the chart as well. Luckily I had a working copy of it that I was using to chart the name so it wasn't completely lost.
It's being stitched on 14 ct Aida in order to match the one made for his older brother. That's not really a problem, however, this chart contains an obscene amount of ¼ and ¾ stitches. Now, if I see these stitches I get a fabric where I can go over two. Also, working on this made me realize just how much I don't care for Aida fabric anymore, I am a much bigger fan of evenweave.
This is one of those projects that I should have done multiple posts on, but I just kept stitching instead of posting, so I apologize for the insane number of pictures.
I picked up everything I needed on my way to my parents' house where I started working on it. Then my sister and nephews showed up, and the little one, who I'm making this for, was curious:
![]() |
| What'cha doing Auntie Em? |
Kellan then decided he needed to help me (which didn't go quickly):
But it'll be a nice story to tell him, he helped with his own cross stitch. It took three or four times longer to stitch, but he wanted to help so badly so there was no way I could say no, and he's just too cute, it was worth every extra minute.
After his help, with the large light green leaf, I got through the leaves much more quickly.
My favorite animal makes an appearance:
And he gets his back stitching:
As you can see in the previous pictures I was using a purple hoop to stitch. I usually use a much smaller, red, hoop, especially on the smaller count HAEDs. I figured since this was a larger count the larger hoop would be better/easier. I was wrong. I didn't like how big it was. It just seemed massive and it seemed more of a chore to stitch. So I went back to the red hoop, even though I knew I'd have to move it a lot more. I started stitching much faster after that.
Back to my preferred red hoop I made a green froggy, with some of the blue back stitching to help me figure out where he's supposed to go.
And now back stitching:
Now, you'll notice on the sample picture there's a blank area on the bottom left above the frog. It seemed to be the perfect place to add the weight and height as I had done on his brother's.
Anyone notice the missing back stitching? I did fix it, I don't remember when I fixed it, or why I didn't take a new picture.
The next animal foliage
This is the new home of a rather yellow giraffe.
Now some back stitching:
There are three mistakes in the giraffe. I only remember where two are, and I'm not telling!
I did the rest of the blue lines so I could find where the blue birdy went.
And he got his back stitching, and for those eagle eyed readers, yes, I initially forgot a row on his tail feathers.
The title of the piece. (Viewed with the top of the giraffe's head.)
Last inhabitant's leaves.
A little brown monkey.
He gets some back stitching which was the last thing to do.
Apparently all animals have swirly cheeks or noses... I never knew that...
And here it is in it's entirety!
It definitely needs to be ironed. We already have the frame for it. We wanted it to match his brother's so we bought it shortly after he was born. Unfortunately, we have no idea where it is at the moment.
Project Stats:
Pattern: Welcome to the Jungle (Discontinued)
Pattern by: Bucilla
Started Stitching: March 4, 2016
Finished Stitching: May 4, 2016
Fabric: 14ct. DMC Aida
Floss: DMC 2 over 1
Percentage: 100% complete
Stitches: 7,519 out of 7.519
While doing the stats I noticed that it took me exactly 2 months to finish, but most of the work was done in the last week, April 26th through May 4th. Off to a different project. I think it's going to be the HEAD Challenge #2.
Project Stats:
Pattern: Welcome to the Jungle (Discontinued)
Pattern by: Bucilla
Started Stitching: March 4, 2016
Finished Stitching: May 4, 2016
Fabric: 14ct. DMC Aida
Floss: DMC 2 over 1
Percentage: 100% complete
Stitches: 7,519 out of 7.519
While doing the stats I noticed that it took me exactly 2 months to finish, but most of the work was done in the last week, April 26th through May 4th. Off to a different project. I think it's going to be the HEAD Challenge #2.
Sunday, May 8, 2016
Mel's Crochet Blanket - Completed
I realized that I did not have a birthday present for my sister whose birthday was at the end of April. I had some yarn that I bought over a year and a half ago for a blanket for her. I decided to finally make the blanket.
I went through a book that was given to me, "The Crochet Stitch Bible" and found a pattern that I liked. I crocheted the first two skein, then found a mistake in the first skein, which I was going to leave, but the more I thought about it the more it bugged me. So about ¾ of the work came out and I continued on.
Here's the first two skeins:
The rest of this will be predominantly pictures.
Four Skeins
Six Skeins:
Almost eight skeins, I didn't have enough to do another row, you can see what's remaining on the left hand side, getting ready for the border:
Finally complete:
I made up the border based on the rest of the pattern. I will say borders are still my weakest part. I appear to not space my stitches very well, they never lay flat, but blankets rarely lay flat, so most people won't notice. The overall size ended up being 4.5' x 6' (1.37m x 1.82m).
Project Stats:
Project: Mel's Blanket
Pattern: Relief Wave Stitch
Pattern by: The Crochet Stitch Bible
Started Crocheting: April 19, 2016
Finished Crocheting: April 25, 2016
Yarn: Bernat: Blanket - Silver Steel
Percentage: 100% complete
My sister's birthday was on the 28th, so I was very proud of myself getting it done on time. She has informed me that it is very warm. Too bad summer is just around the corner, but there's still a little bit of time to use it before it gets too warm at night.
I went through a book that was given to me, "The Crochet Stitch Bible" and found a pattern that I liked. I crocheted the first two skein, then found a mistake in the first skein, which I was going to leave, but the more I thought about it the more it bugged me. So about ¾ of the work came out and I continued on.
Here's the first two skeins:
![]() |
| April 20, 2016 - 12:20 am |
Four Skeins
![]() |
| April 21, 2016 - 11:05 pm |
![]() |
| April 25, 2016 - 11:36 am |
![]() |
| April 25, 2016 - 5:11 pm |
![]() |
| April 25, 2016 - 8:38 am |
Project Stats:
Project: Mel's Blanket
Pattern: Relief Wave Stitch
Pattern by: The Crochet Stitch Bible
Started Crocheting: April 19, 2016
Finished Crocheting: April 25, 2016
Yarn: Bernat: Blanket - Silver Steel
Percentage: 100% complete
My sister's birthday was on the 28th, so I was very proud of myself getting it done on time. She has informed me that it is very warm. Too bad summer is just around the corner, but there's still a little bit of time to use it before it gets too warm at night.
Saturday, January 30, 2016
Mini Artists Galleries - Leonardo Da Vinci: First Post - Completed
Let's try a post a day the rest of the month, all two days! I'm going crazy here!
Okay, I got a little crazy on this post, sorry. ;D I knew I was going to which is why it took me so long to blog about it.
This was a piece I found on CloudsFactory's website. My sister loves Leonardo Da Vinci and I found this fun little piece. I showed it to her to make sure she'd like it, since it is kind of cartoony. Of course between the two of us we had to mess around with it a little bit. To the right is the original design. My sister though it might look nice with the wording surrounded by Leonardo and his works. So it took a bit of playing around, but I finally came up with something that I thought looked good. But I won't show it to you now, you'll either have to read to the end, or scroll down to the end.I decided to use one of my favorite fabrics for this 28ct. Legacy Cashel Linen by Picture this Plus, since, again, it's a parchment like color.
First off, was the wording. I was actually driving home from work, ready to stitch this as soon as I got home, when I came up with an idea. Leonardo was famous for trying to keep his works secret, one way that he attempted to do so was by writing mirrored. I found a little information about that here if you're interested. So I thought it would be cool to stitch the writing backwards. However, it was a big leap so I consulted my sister to find out her thoughts and she thought it was a great idea, so I did it.
Here is it mirrored, or unmirrored, so you can read it:
The next thing I stitched was Leonardo himself.
First off I did the three sketches at the same time, which were surprisingly close in color to the fabric I chose. The titles are links that lead to webpages about the images.
| Aerial Screw | Self Portrait | Vitruvian Man |
| First Color | ||
![]() |
![]() |
![]() |
| Remainder of Cross Stitches | ||
![]() |
![]() |
![]() |
| Back Stitched | ||
![]() |
![]() |
![]() |
| "Framed" | ||
![]() |
![]() |
![]() |
Next, the paintings, again the titles go to pages to learn more about them, if you're so inclined.
| Lady with an Ermine | The Last Supper | Mona Lisa |
| Some Colors | ||
![]() |
![]() |
![]() |
| Rest of Colors | ||
![]() |
![]() |
![]() |
| "Framed" | ||
![]() |
![]() |
![]() |
I did change the color on the frames for these. It was supposed to be the golden yellow that you can see in the clothing of the fourth figure from the right in The Last Supper. I changed it to Kreinik #4 braid, Vintage Gold.
And finally, all together:
It's now in the process of being framed, so hopefully I'll get that posted faster than some of my other pictures.
Project Stats:
Pattern: Mini Artists Galleries - Leonardo Da Vinci
Pattern by: CloudsFactory
Started Stitching: December 3, 2015
Finished Stitching: December 9, 2015
Fabric: 28ct. Legacy Cashel Linen
Floss: DMC 2 over 1, Kreinik 1 over 1
Percentage: 100% complete
Stitches: 2,866 out of 2,866
Subscribe to:
Posts (Atom)