Tuesday, August 30, 2016

Here Be Dragons: Third Post - Framed

Here's the second half of Compass Rose Dragon, Here Be Dragons.  So, except for the specialty cut around Compass Rose Dragon, I framed them the same.


And that's all I have for this post.  Much shorter than Compass Rose Dragon.

Sunday, August 28, 2016

Compass Rose Dragon: Fourth Post - Framed

So this will be a little bit longer than a single picture with a framed piece.  As most of you know, I worked in framing and many people I framed for don't know about a simple option, so I'm going to show you really quickly.

Most people know when you frame and mat items there's a white 45° bevel on the edge of the mats.  But what most people don't know, is you can make it so the white doesn't show, it's called a reverse bevel.

On this piece I wanted a reverse bevel on my mats, however, the chop shop didn't cut them correctly so I have the two different options to show side by side:
Regular Bevel
Reverse Bevel
I thought the white from the bevel was too bright with this piece, I thought it looked much better without it.  Especially since the mat colors are so dark.  You can't even tell the middle mat is green on the first picture, or, at least, I can't.

And finally it's all put together with the frame:


And that's it from me this post.  I have actually been working on stuff, I just haven't gotten far enough to actually post anything on them.

Saturday, August 20, 2016

Seashell Treasures: Second Post - Framed

I framed my mother's seashells at the same time as Kellan's name.  So I have that one to share with you today.

This really isn't that great of a picture.

The top mat is kind of an off white shiny looking mat.  The next one is a dark burgundy, and the bottom is a lightish pink, probably the one closest to its true color.

I decided to take a picture of where it's hanging.
The top mat looks closer to color in this picture.  But I just figured the mahogany frame would make more sense in context.

Tuesday, August 16, 2016

Train Kellan: Second Post - Framed

This is going to be short and sweet today... Or probably just short.

So here's the framed version of Kellan's Train themed name:


We just framed it exactly the same way as we had framed Logan's.  Everything's the same, the size, the mat colors, the mat widths, and the frame.  So nothing really exciting here.  Now just to wait for November for him to open it on his birthday.

Tuesday, August 9, 2016

Punch of Color Girls 4: First Post

I had mentioned this picture on my blog, a long time ago.  I honestly don't know when.  I had liked Hannah Lynn's designs, her choice of bold, bright colors against the stark black outline.  I had wanted to work on one, but none appealed to me enough to actually take the time to stitch it.  Until I found this one, Punch of Color Girls 4.

She's a little bit like me, a tomboy.  It looks like she's wearing overalls, like a boy, and looks like she has just about the same amount of paint on her as she does on whatever she was painting and doesn't seem to bothered at all.  However, she's still girly, which I find myself being from time to time.

I actually started her a while back, November of last year.  I decided I was going to do her all at once, extreme cross country, pretty much the opposite of what I did on my last post.  So I started with all the black and just started stitching...

and stitching... Ohh!  I found an arm!

and stitching... and... hair...

...and stitching... a hat!

...and stitching... more hair (she definitely has more than me)...

...and stitching....
There she is!  I did most of the bottom right hand corner after I finished page 2 of Planet Dragons.  I thought I had taken a picture just after I'd finished her eye which is where she actually sat for quite a while, but apparently I hadn't, so there's a big jump between the last two pictures.

I'm thinking I'm going to do the white next, which is over 20,000 stitches.  You might not see her again for a while.

Project Stats:
Pattern: Punch of Color Girls 4
Original Artist: Hannah Lynn
Pattern by: Heaven and Earth Designs
Started Stitching: November 8, 2015
Fabric: 28ct. White Evenweave
Floss: DMC 1 over 1
Percentage: 12.51% complete
Colors Stitched: 1 of 89 complete
Stitches: 8,839 out of 70,631 complete

Hmm... now what am I going to work on?

Monday, August 8, 2016

SS Planet Dragons MC: Second Post - Page 2

As I mentioned in my previous post I was going to do the HAED Facebook Challenge #3 with Planet Dragons, and it was the dreaded parking.  So here's how it went:

My first picture, showing the fabric before the challenge, you've already seen this, pretty much, in my previous blog.

We were allowed to do the whole 10 stitch row at a time, which made me happy since I'm pretty paranoid about the 10x10 squares becoming visible when I stitch, one of the reasons why I preferred cross country stitching.  I use a hoop and decided to keep my threads on the needle since I figured re-threading could cause more damage to the thread.  I immediately made a mess.

By the time the whole row was done, I'd made an even bigger mess.
But I told myself I would do this and maybe see if I began to like it the more I stitched.

So here I am at the halfway point.  By this point I've realized two things, one, it's not very easy to park with a hoop, I couldn't really extract my hoop from this project to work on anything else if I wanted to, and I like to take my hoop off each night after stitching.  This picture shows the one time I did completely remove the hoop.  And the second thing I'd realized is I REALLY don't like parking.
The hanging threads are constantly in my way.  Either they're trying to get trapped under the threads I'm stitching or they're hanging down right where I'm trying to stitch.  I've seen many parkers with multiple needle minders to keep things organized, however I own absolutely no needle minders.

I was having one heck of a time trying to get this done and stay motivated to work on it, but with the hoop trapped on the piece I could either take 20 minutes extracting and reattaching it, or just finish the thing.  I can't explain how happy I was to get to this last row, when I could finally put the ends of the threads where they belong.

And finally done!!
No more random threads sticking out, everything clean... hoop removed.  I'll call it a success.

An interesting note is that when I normally stitch I go from color with the most stitches to the least, I did it the other way around here.  I did the least amount of stitches in the row, then finished with the most.  I think I did this to try to get most of the threads at the bottom of the row and more out of my way.

Pattern: Supersized Planet Dragons Max Color
Original Artist: Rob Carlos
Pattern by: Heaven and Earth Designs
Started Stitching: May 31, 2016
Fabric: 25ct. Magic Guide
Floss: DMC 1 over 1
Percentage: 2.7% complete
Pages: 2 of 78 complete
Stitches: 15,382 out of 570,429 complete

Now that I have actually tried parking I can honestly say it is not for me.  I'll stick to my cross country, except for any other challenges that may come along.  So now my hoop is free and I'm going to finish off part of another project really quick.

Tuesday, July 19, 2016

SS Planet Dragons MC: First Post - Page 1

For those of you who aren't familiar with with Heaven and Earth Designs, SS and MC stand for Supersized and Max Color.  First off, I would like to say I swore I would never to a supersized chart.  They take too long... and I just don't stitch that fast.  Well that was until I saw that someone had requested this chart not only supersized, but also with max colors.  So this chart is 999 stitches wide by 571 stitches tall and contains 239 colors.

So it may come as no surprise to you that I love fantasy so stitching dragons is a no brainer for me.  However, what you may not know about me is that I love astronomy.  So this pattern puts two of my loves into one piece.  And Pluto is included!  <3 Pluto!

For this I actually requested the kit from HAED.  I had two reasons for this.  One; if I had to buy all the colors in skeins it's possible that there would be two different dye lots and that could make it look bad.  If I'm going to spend so much time on this I want it to look right.  Two; it's ALOT of floss in lots of different colors.  I thought having them do it would just be easier.  Lucky for me when I requested this kit there was a 20% or 25% off, I can't remember which, sale going on.  And the kit was ready to order long before the sale was over.


One thing I will say about the kit is it's very nice.
Kit Box
Opened Kit Box
It comes with a wooden needle holder and the needle.  I also got a blue and green needle threader, which are the perfect colors for me, even though I still haven't used it.  I also ordered 5 Bohin needles because many folks on the HAED Facebook page just loved these needles.  Most of the floss is on rings attached to laminated cards, I was putting it back in the bag at first, but that became rather tedious, so it's no longer in it's plastic bag.  The four colors with the most floss are in the second bag, they are still in that bag, correction, one is sitting on top of the bag, the other three are in the bag.

So I started this at the end of May, I couldn't keep myself from starting it.  I started stitching with the Bohin needles.  While nice, they did not work for me as well as I had hoped.  I went back to my DMC size 28 needles.  They are flimsy and the eye does tend to warp, but they're thin, and when you're using one thread that's helpful when trying to finish the thread off by running it under the stitches on the back.  I'll probably give the Bohin needles another try when I work on 14 through 18 count fabric.

On to the stitching.  I was a bit worried on doing a Max Color chart.  I wanted to do this one max color because of all the different colors in the planets.  I thought with more colors they'd be closer to the artist's color, and it would look better.  My apprehension was on the background.  Would the colors be added to the background and make it ridiculously filled with different colors, or would it be decent?

I was happy with the answer.  The first page only contains 20 colors, 16 of which are actual background colors, the other 4 are in the tip of Mercury's wing.

I took pictures one color at a time for a bit.

One color:

Two colors:

Three colors:

Four colors:

Then I just got carried away and just finished it off.

The bottom unstitched bit is the beginning of Mercury's wing.  I'll do that when I get to the page below it.

Pattern: Supersized Planet Dragons Max Color
Original Artist: Rob Carlos
Pattern by: Heaven and Earth Designs
Started Stitching: May 31, 2016
Fabric: 25ct. Magic Guide
Floss: DMC 1 over 1
Percentage: 1.37% complete
Pages: 1 of 78 complete
Stitches: 7836 out of 570,429 complete

The next challenge from HAED is parking a full page.  Blech.  At first I was going to skip this one, but I realized if I did that it would be the opposite of what the challenges are for.  To get you to try something different.  If you try it, you might like it.  I'm going to do page two of this pattern for the challenge.  I picked that because I wanted to take baby steps into parking, page 2 only has 11 colors, so I think that's the best way to approach it. And thankfully they're allowing lightly feathered pages.  I think mine qualifies as light feathering.

Wow, this ended up being a lot longer than I thought it was going to be.  I don't know when my next post will be, but I'm going to try to catch up.  I have much more to blog about.

Monday, July 18, 2016

Welcome to the Jungle: Second Post - Framed

Alrighty.  It has been a while...  So I've been busy, I'm starting a new job tomorrow!  Yay!  So hopefully now I'll have more time for crafting and I'll be less tired.  Who knows, the new job might kill all my desire to craft... I really hope not.  My craft room will get lonely if I don't craft.

Moving on.  I have tons of framed items to share.  Today I'm going to share Welcome to the Jungle.  This was for my youngest nephew.  We framed it the same way we framed his brother's so that was really easy.

Here we go:

I was at my sister's house when I took this and my mother was there too, so they decided we should take a picture with Kellan next to his cross stitch.  We told him to sit by his picture...
 ... Apparently we should have been more specific.

So we told him to sit next to the picture.
Much better.

And of course the eldest didn't want to be left out so we took his off the wall and took a picture with him next to his.
My mother actually stitched this one, but I did frame it, so up on my blog it goes!

The boys are 2 ½ and 5 ½ in the pictures which were taken about a month ago.  They grow so fast!

I have a few things to blog about, I just don't want to stop working on things long enough to blog.  Also I'm starting to work off of my iPad instead of my laptop, so before I'd already have the laptop on and would just blog, now I need to turn on the laptop, and it's much easier to just continue stitching.  I'm going to work on another long overdue post.  I'll see you again soon!

Friday, June 3, 2016

Train Kellan: Second Post - Completed

I finished up Kellan's train name this morning.

Here's the smoke/steam is added to the letter K, it's gray Kreinik.  The original pattern had the smoke/steam fully stitched, but since I was trying to match the other one I made I just kept it as an outline.

So next up was the A.  I did the same thing on this one as the A in the other one.  It got a hat.  This time and engineer hat.  This one was the moth difficult to make.  I did finally find a hat in the correct orientation, but the only way I could achieve what I wanted included a massive amount of back-stitching.  But I'm getting ahead of myself.

First off is the A.

The hat is all one color, so this was an easy one to stitch.

And then the crazy amount of back-stitching:
This is the letter that I'm least happy with, but when I look at it from far away I don't think it looks too bad.

The next letter is the last, so it has to be the caboose.  This one started as a caboose I found online.  But I did modify it quite a bit.  It was a more realistic looking caboose.  I altered it heavily to try to give it the same look as the engine.  This one went through a few edits after sending some samples to my sister.

The letter N is quite covered, not as much as the K though.

All stitched in the standard red color, with a little bit of yellow to make it a little more interesting.

This had a bit of back stitching too, but not as much as the engine.

At the bottom I added a border, but this time I just kept it simple as a train track, however it was a lot of stitches and seemed to take forever.

All done!  And done long before I needed to have it done.  Now I just need to get it framed.

Project Stats:
Pattern: Train Kellan
Pattern by: Me, using letters from Firefighter's Sampler
Started Stitching: May 23, 2016
Finished Stitching: June 3, 2016
Fabric: 28ct. White Evenweave
Floss: DMC 2 over 2, or 1 over 2 Kreinick #4 Braid
Percentage: 100% complete
Stitches: 3,772 out of 3,772 complete

Saturday, May 28, 2016

Train Kellan: First Post

Some of you may remember the name I cross stitched for my first nephew, Logan.  For those of you who have no idea what I'm talking about you can find the posts here.

My younger nephew likes trains, that is what my sister thinks she wants to change his room to.  However, she's having difficulties finding anything other than Thomas the Train, and she doesn't want to go that route.  So I started scouring the internet for train letters.  I found quite a few, but none were what I wanted.  Most were an engine on the front, letters on flatbeds and a caboose.  However, I wanted to keep the two as similar to each other as I could.  So I decided to do the only thing I could, design my own.

And that's what I did.  I used the same letters from the original Firefighter's Sampler and created a train theme.

The first letter up is L, or Ls.  I decided these would work well for some train crossing signals, one for each L.  I found an photograph and copied it as best I could.  However, the only way I could get it to work the way I wanted was for the poles to be off a half a stitch, and since I was going to be stitching this on evenweave it seemed completely doable.

First the letter, in the same blue color as Logan's, I had originally thought of changing it to green.  But my sister suggested to keep it the same color.  I think I like the pattern better with the blue anyway.

Now for the crosses of the crossing signals.

And some back-stitching so you can actually see where the white is.
And there they are.

Next up is the E.  My sister suggested a tunnel for the A, but I already had another idea for the A, and I thought that too much would be covered up of the tunnel if I used that letter, so the tunnel went to the E.  This one I just made up.  I didn't use a picture or anything, I just kind of did a stereotypical tunnel.

E first, the entire E is actually visible, the tunnel goes behind it.
So when I counted and double counted to make sure I counted right, I eventually found that I hadn't counted right.  Everything was two stitches too far to the right.  I knew I had to fix it or the tunnel would run into the signals, and I didn't want that, so I did a little creative cross stitching and corrected my mistake without having to tear out every single stitch.

Now for the tunnel.  I tried to make a kind of brick looking archway around it.  And it's dark in there, so there's black, and then the light gray on the bottom for the rock ballast that hold the wooden ties.
Originally there was going to be a cross stitched line of brown for the closest tie, but I was showing my design progress to my sister and she thought it looked weird and asked me try it without it, and after I altered it, I agreed the new design looked better.

Which leads me to the next image with all the back-stitching.
The "closest" two ties are actually long-stitched with two strands, while the rest are single strands, and I did long stitches as well for the rails so they looked like one continuous piece of metal.  I didn't back-stitch around the brown, I was hoping that would give the feeling like the brown didn't end there, but rather continued to the rest of the hill.

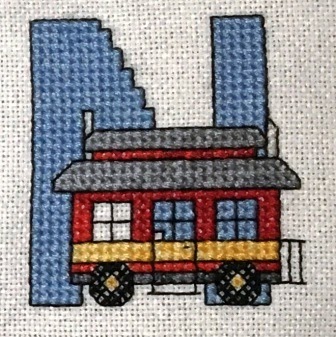
Next one is K.  This is the first one designed, and, I have to admit, this is the letter that I designed the least.  Since the K is the first letter it seemed fitting that it would have the engine.  I had found a simple pattern that I really liked, and, surprisingly enough, it ended up being the perfect size.  So, I copied it, my apologies to whoever actually created it, but since I'm not selling this I think I'm okay.  But here's the blog post with the original image I used to create mine.
After my misadventure with the E I decided to make doubly sure that I counted correctly on the K.  And I failed, this time it was one stitch too far right.  Maybe I'll have more luck with the other two letters.

Here's the train in front of the K.

And a massive amount of back-stitching was done on this.
You may have noticed a few missing back-stitches on the K, well, that's where I'm going to use a gray Kreinik for the steam or smoke coming out of the stack.  I just forgot the Kreinik at home.

Project Stats:
Pattern: Train Kellan
Pattern by: Me, using letters from Firefighter's Sampler
Started Stitching: May 23, 2016
Fabric: 28ct. White Evenweave
Floss: DMC 2 over 2
Percentage: 57.63% complete
Stitches: 2,174 out of 3,772 complete

So, this was one of the two pieces I was supposed to work on next from my list.  Even though his birthday isn't until November, I wanted to get it done before a custom framing coupon expires.  However, I ordered a kit from HAED.  And it's VERY tempting to start on it.  I must resist!
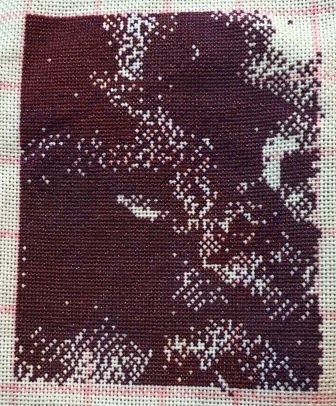